Connectivity
GE TLS (Anonymous)
Configure a GE ultrasound system to send DICOM to HeartLab using anonymous TLS.
GE TLS (Anonymous)
This guide explains how to configure a GE ultrasound machine to securely send DICOM studies to HeartLab using anonymous TLS (Transport Layer Security).
If TLS is not available on your ultrasound machine or within your organisation, a secure VPN connection should be configured before sending DICOM studies externally.
Please contact your local IT administrator if you are unsure which method applies to your environment.
Before You Begin
You will require:
- Administrative access to the GE ultrasound machine
- Access to HeartLab DICOM settings
- A USB drive for transferring certificates
These steps involve administrator-level changes on the ultrasound machine and may affect all users of the system.
If you are unsure whether you are authorised to make these changes, contact your local administrator or HeartLab representative.
Information Required for Setup
The first step is to gather the required HeartLab DICOM connection details.
- Navigate to Settings > Integrations > DICOM
- Select View DICOM Endpoints.
- Under DICOM via TLS, note the following values:
- Server AE Title
- Server IP Address
- TLS Port (
11112)
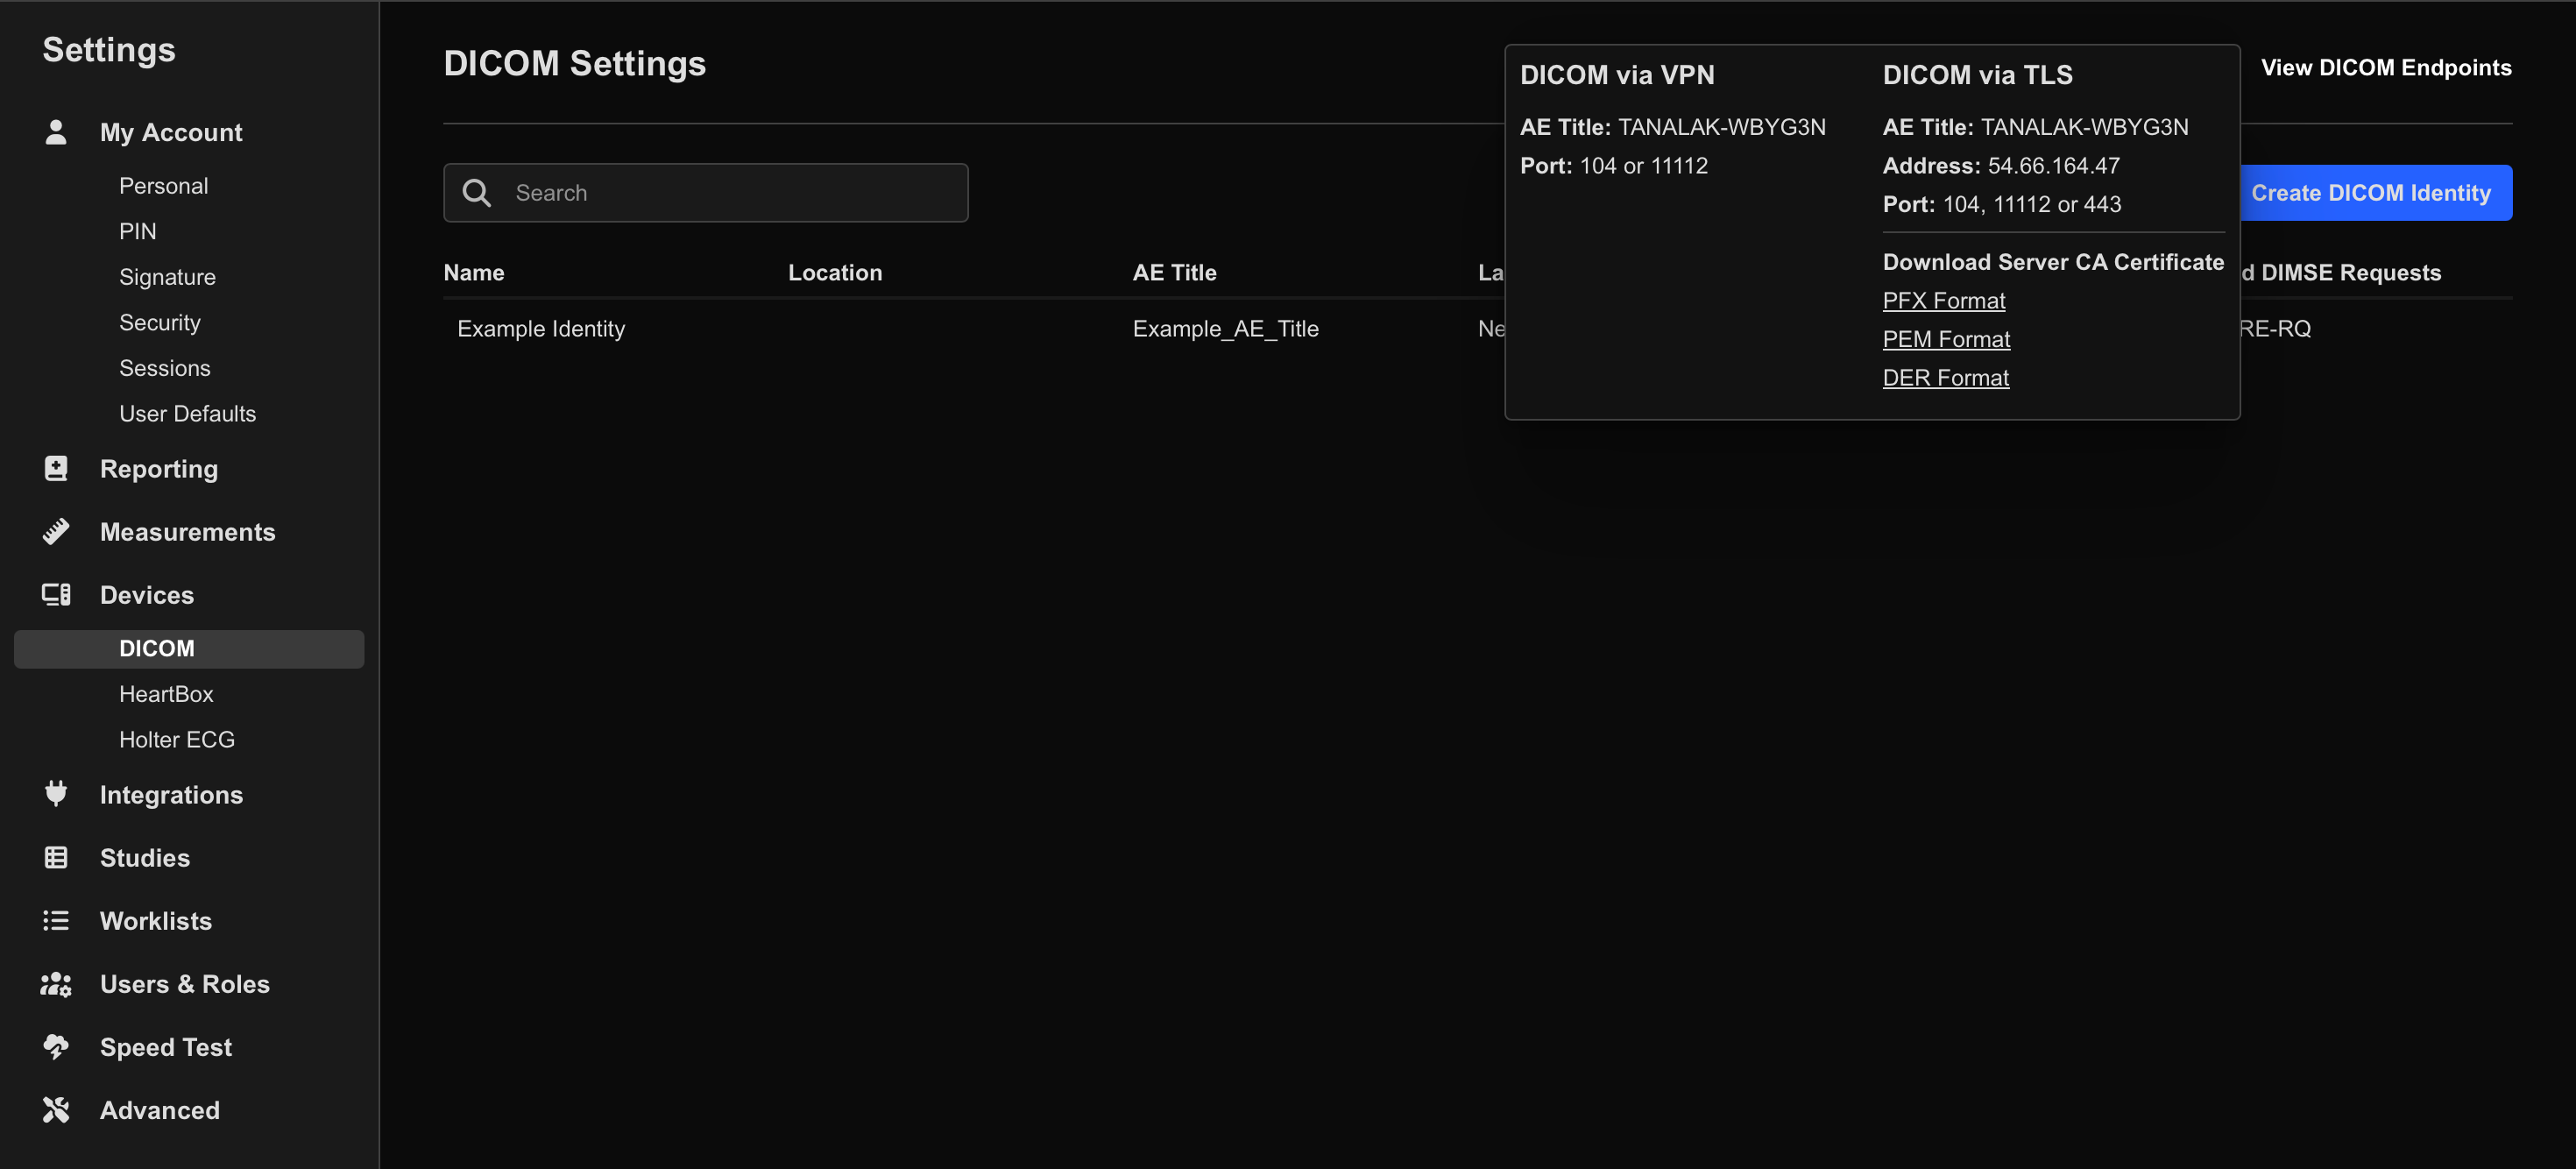
Next, create a DICOM Identity in HeartLab.
- Select Create DICOM Identity.
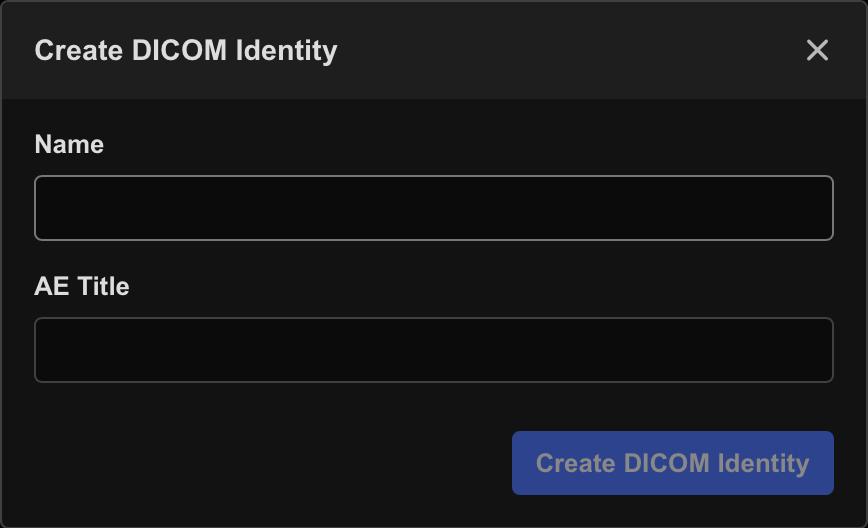
- Enter:
- Name: A recognizable device name (for example,
GE E95 - Room 1) - AE Title: The device AE Title
- Name: A recognizable device name (for example,
GE machines commonly display their existing AE Title under:
Config → Connectivity → TCP/IP → Computer Name. The AE Title configured on the machine must exactly match the AE Title entered into the HeartLab DICOM Identity.
You should now have:
- Server AE Title
- Server IP Address
- Device AE Title
Download the Server Certificate
The GE machine requires the HeartLab Server Certificate to establish a trusted TLS connection.
- In HeartLab, navigate to Settings > Integrations > DICOM
- Select View DICOM Endpoints.
- Under Download Server CA Certificate, select:
- PEM Format
- Save the certificate file to a USB drive.
Connect the GE Ultrasound Machine to HeartLab
Import the Certificate
- Insert the USB drive containing the certificate into the GE machine.
- Sign in as the administrator user (commonly
ADM). - Navigate to Utilities > Config > Admin > LDAP
- Select Client Certificates.
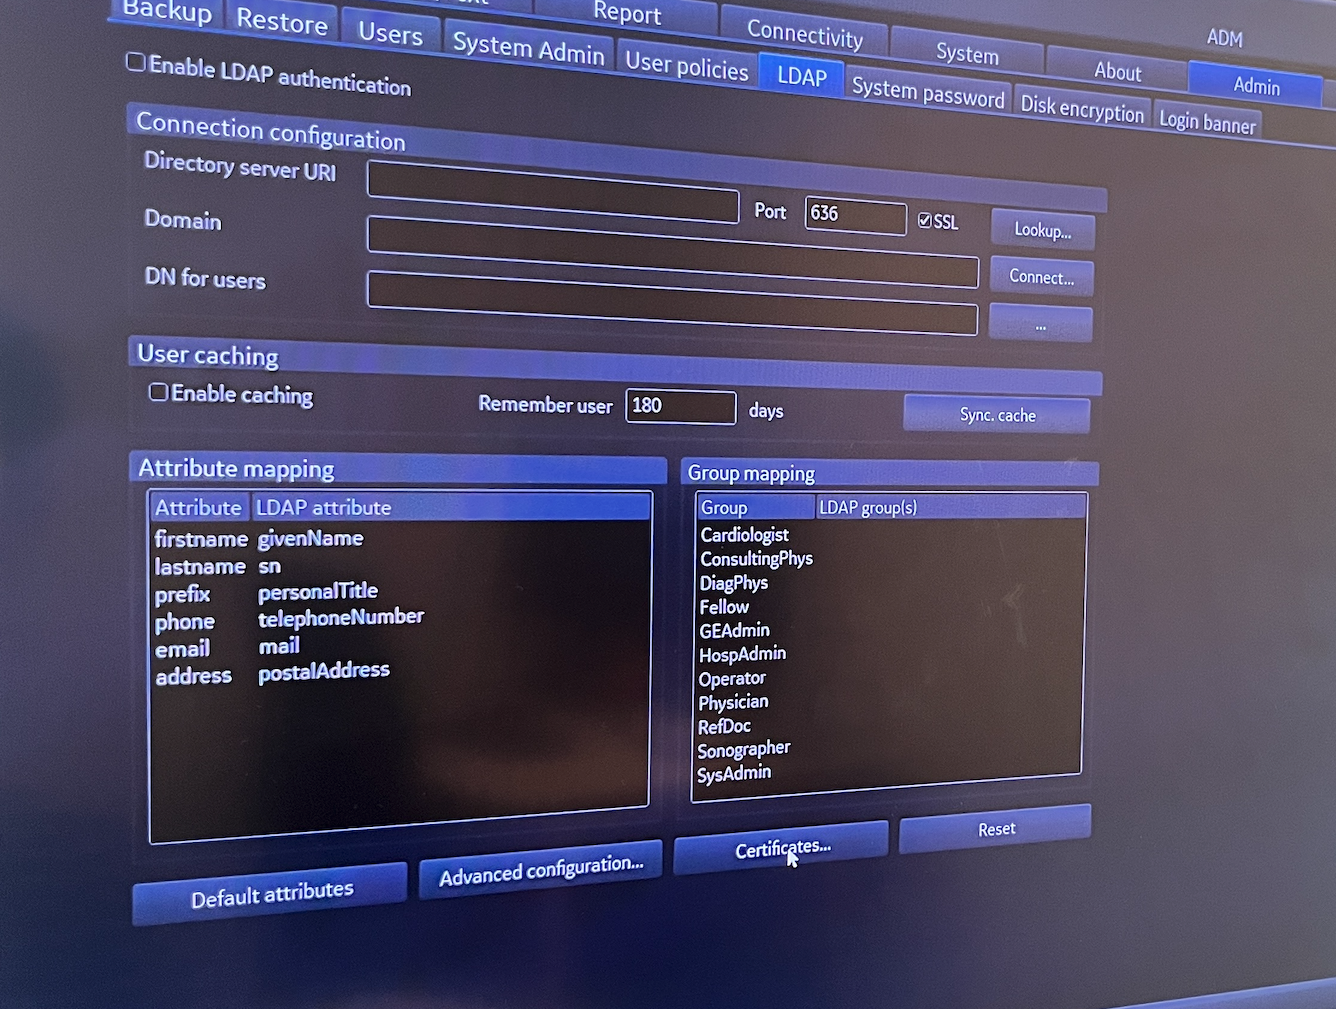
- In the dialog:
- Select Trusted Root Certification Authorities
- Open the Certificates folder

- From the toolbar, select Action → Tools → Import
- In the Import Wizard:
- Browse to the USB drive
- Locate the HeartLab Server CA certificate
- Select Open
You may need to change the file type filter to All Files if the certificate does not immediately appear.
- Enable:
- Mark this key as exportable
- Include all exported properties
- Complete the wizard by selecting Finish.
Apply the TLS Certificate
- Navigate to Utilities > Config > Connectivity > TCP/IP
- Select Client Certificates.
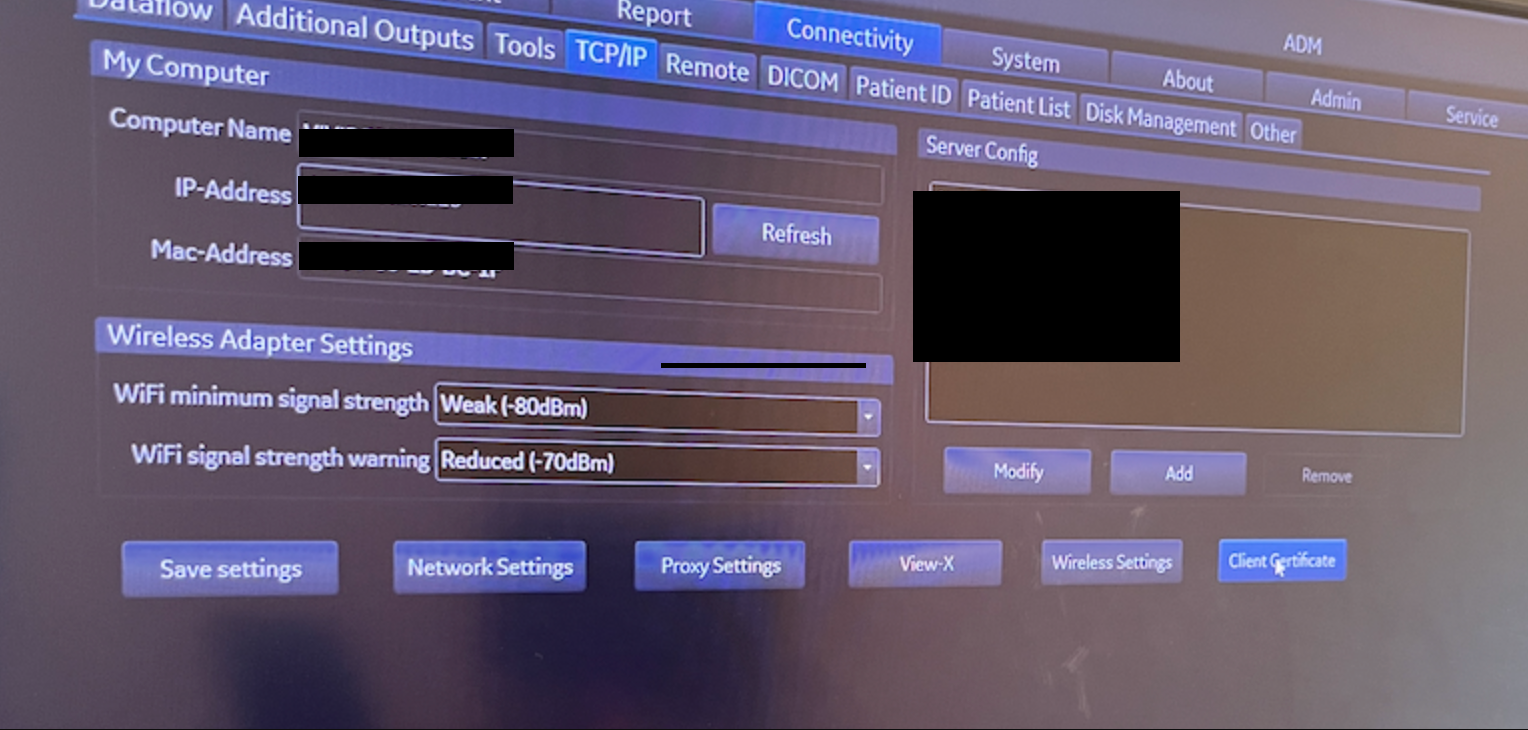
- Select My
- Locate the imported HeartLab certificate.
- Select the certificate and click OK.
Configure Dataflow
To configure study sending:
- Navigate to Utilities > Config > Connectivity > Dataflow
- Create a new dataflow or edit an existing one.
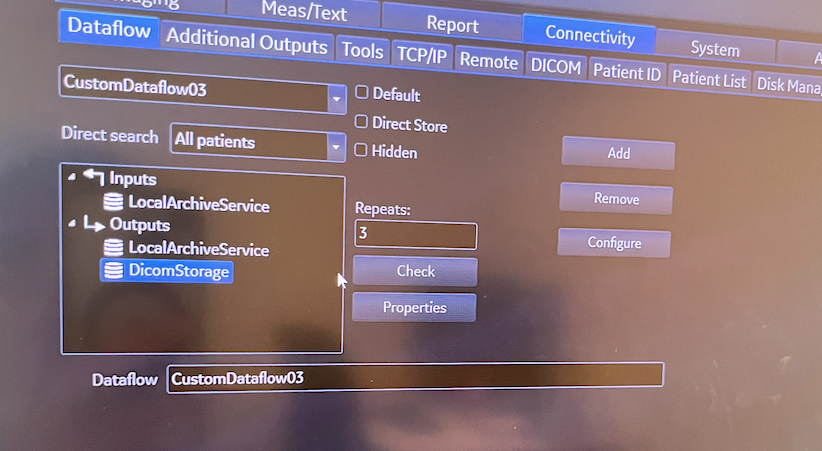
- Select Configure.
- Add:
DicomStorageto the dataflow outputs
- Ensure:
LocalArchiveServiceis added to both Inputs and Outputs
- Select
DicomStorageunder Outputs and click Properties.
Configure the following:
| Setting | Value |
|---|---|
| IP Address | HeartLab Server IP Address |
| Name | Friendly name (for example, HeartLab PACS) |
| AE Title | HeartLab Server AE Title |
| Port Number | 11112 or 104 |
Enable the following options:
- Transport Layer Security
- Allow SR
- Allow SR Private Data
- Allow Multiframe
Configure compression and timeout settings as preferred. If unsure, leave the default settings unchanged.
- Select OK to complete setup.
It is recommended to enable Default so this dataflow automatically applies to completed studies for all users on the machine.
Verify Connectivity
After setup:
- Run the connectivity check from the GE dataflow target.
- Send a test study.
- Confirm the study successfully appears in HeartLab.
Troubleshooting
Common causes of failed DICOM transmission include:
- AE Title mismatch
- Incorrect IP address or port
- Missing or invalid TLS certificate
- Incorrect dataflow configuration
The AE Title configured on the GE machine must exactly match the Device AE Title configured in HeartLab.
On GE systems running software version 204 or later, connectivity checks may fail if ICMP echo (ping) is enabled.
If this occurs, disable the ICMP echo request option under:
DICOM → Advanced Settings